1 Create an account

In the first step of this comprehensive guide, we'll first take care of creating a new account. Of course, since Facebook Live is part of Facebook, you'll need a traditional Facebook account. In case you already have one, you can use it. However, we recommend that you separate your personal account from your streaming account and create a completely new account for your streaming activities. In this guide we will take you through the registration process step by step. All you need to create an account is your first name, last name, mobile number, email, password, date of birth and gender.
- Visit facebook.com using an internet browser of your choice.
- Click on the green button "Create account
- Fill in the appropriate fields and then click "Register".
- Confirm your new Facebook account by entering the verification code that was sent to your phone.
Registration should be quick and hassle-free, so you can quickly skip to the next step.
2 Set up profile / create page

Now we would like to look at how you can use your new Facebook account to set up your profile so that you can start a livestream.
Just log in with your Facebook account and in case it's a new account, first get an overview of the Facebook user interface. To start a stream, you need a so-called Facebook page. This is a separate profile that cannot be publicly associated with your main account, but is still part of the main account. So to speak a subpage of your real Facebook account.
Pages have the great advantage that you can communicate with your community in the classic Facebook manner. You can create posts, announce streams and keep your audience permanently up to date. You can create company pages, fan pages, artist pages or creator pages. Your new page should contain all information about you as a streamer and creator.
Therefore, when setting up your page, make sure to provide only truthful and useful information for your visitors.
- You can get to the page creation screen by clicking on the "Pages" menu item on the left side of the home screen.
- Click on the "+ Create new page" button.
- Enter your page information. Be sure to be brief, concise, but meaningful in describing what you do, who you are, and where people can find you.
- Choose a category that applies to you - for example, Gaming Video Creator.
- Enter the rest of the information about you and your channel.
2.1 Profile picture
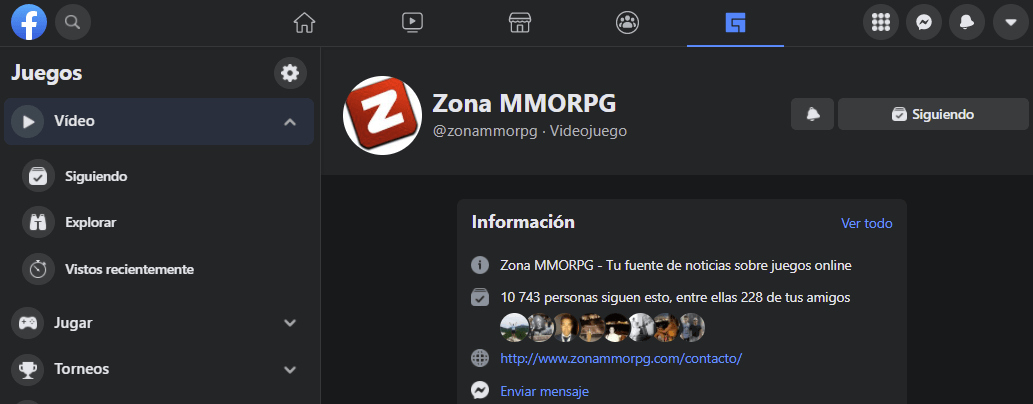
The profile picture of your page is at best not only nice to look at, but also reflects you and your work as a creator. With an appealing profile picture, you can not only ensure a good first impression on Facebook - you can also arouse interest in potential viewers. The perfect profile picture is timeless, individual and can be associated with the associated channel in the mind within a few moments.
Since the profile picture can be changed with 2 mouse clicks, you don't have to worry if you don't have the ideal picture ready right away. So instead of using the placeholder profile picture generated by Facebook, we recommend you to use at least one picture that fits to some extent. This way, your page will immediately look more individual. For example, in our store you can find the innovative Avatar Maker, which allows you to create images for your career as a streamer and then use them as your profile picture as well.
- Profile picture minimum size: 180 x 180 pixels
- Profile picture recommended size: 2048 x 2048 / 720 x 720 / 360 x 360
Displayed sizes of profile pictures:
- PC: 170 x 170 pixels
- Mobile: 128 x 128 pixels
- Other: 32 x 32 pixels
Change profile picture:
- To change the profile picture, click on the small camera icon on the lower right side of your current picture.
- In the following window click on the button "+ Upload photo".
- Now you will get to the file explorer of your operating system.
- Navigate to the desired image, select it and click on Open.
- Afterwards you can adjust the image to the circular preview image and add a description.
- Finally click on Save.
2.2 Pagecover
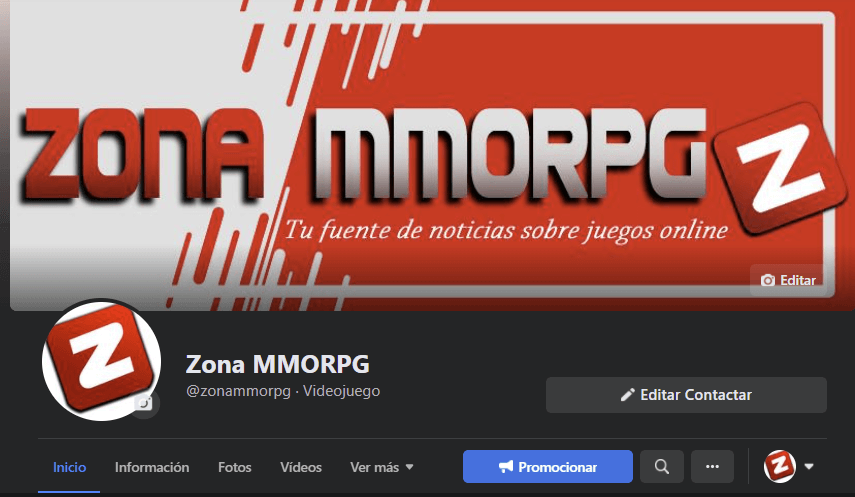
Your Facebook Pagecover is the cover image that adorns your channel and represents when people visit your page. The page cover should contain all the important information about your channel and, at best, pick up on or even complement the design of the profile picture. Since the page cover is placed quite prominently and also has a lot of space for information, it is perfect for showcasing your social media profiles or links to your channels.
- Recommended size for the page cover: 820 x 312 pixels
To ensure that the page cover is fully visible on both PC and mobile devices such as tablet or smartphone, it should have a size of 1250 x 463 pixels.
2.3 Finishing the page creation
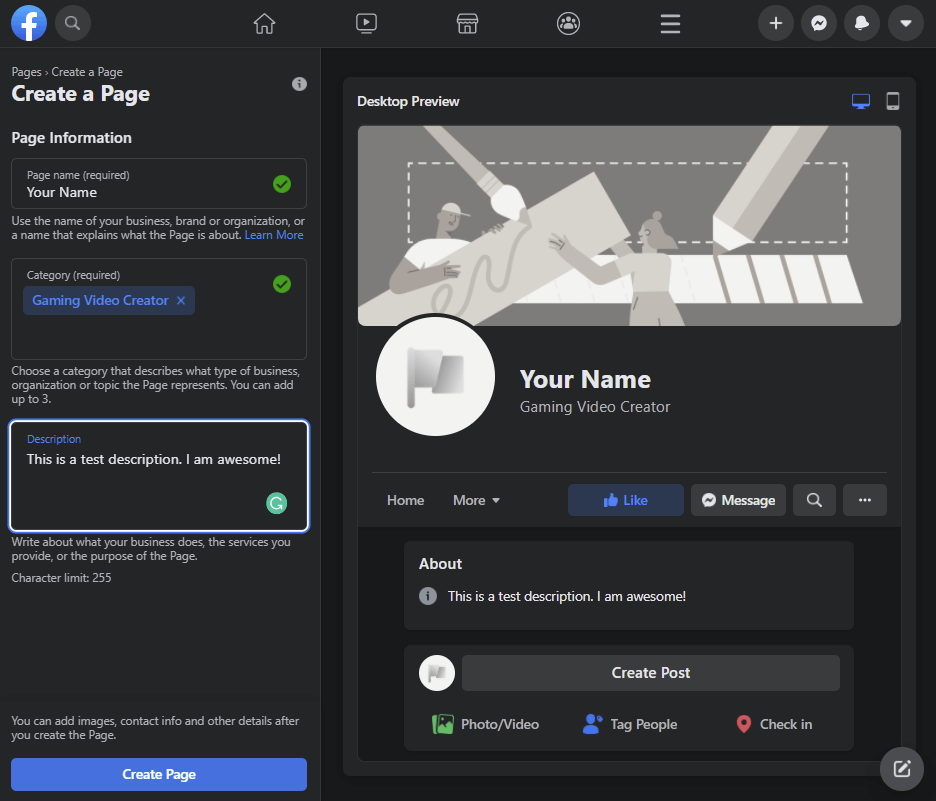
Once you have set up all the information including profile picture and page cover, you can finish creating your new Facebook Page by clicking "Create Page".
The last step that needs your attention is setting the username. That is, the name under which your page will be stored on Facebook and in the corresponding URL that leads to your page. So if your page is called "TimsGamingRoom", you should set the same name as your username if possible. Your page will then be available at www.fb.com/TimsGamingRoom.
Please note that your page must already have at least 25 likes - before that you will not be able to create a username.
3 First steps

That was fast, wasn't it? Your account is created, your page is set up - now you can take care of the finer details of your page. From now on, you'll find many different settings and personalization options in your site's settings.
Take a close look at the options and try to fill in as much as you can to the best of your ability, so that at the end of the procedure you have a credible, authentic and individual profile. If your viewers want to learn more about you, they shouldn't necessarily be left with an empty Facebook page and disappointedly turn on their heels to look for another streamer or ask for more information in your chat.
We have listed the most important points for the fine-tuning of your page.
- Info and history: Think about a suitable description of your page. Here you can write down all information about your history, your ambitions and your content.
- Category: Define a category that fits your site. Are you an artist, gamer, musician or entertainer? No matter what you are, you'll find the right category on Facebook.
- Social media accounts: In the Description field, you can link to your other social media accounts in addition to your channel description.
- Contact Information: This is where your viewers will find information on how best to contact you. Please note that all the information you disclose here is publicly viewable. So if you don't want to reveal your email address or phone number, you can link to your social media accounts or Facebook's Messenger feature in the description.
4 Go live

And excited already? Your first livestream on Facebook Live will start any moment now. But in order for Facebook to know exactly how to classify you, what you want to achieve, what audience you want to target, etc., we advise you to set up a livestream beforehand using Facebook's Stream Manager. Here https://business.facebook.com/live/producer you can choose what the goal of your livestream is. Since you are surely interested in long-term growth, we recommend you to select the option "I want to build a community".
4.1 Set how to start/broadcast the live video
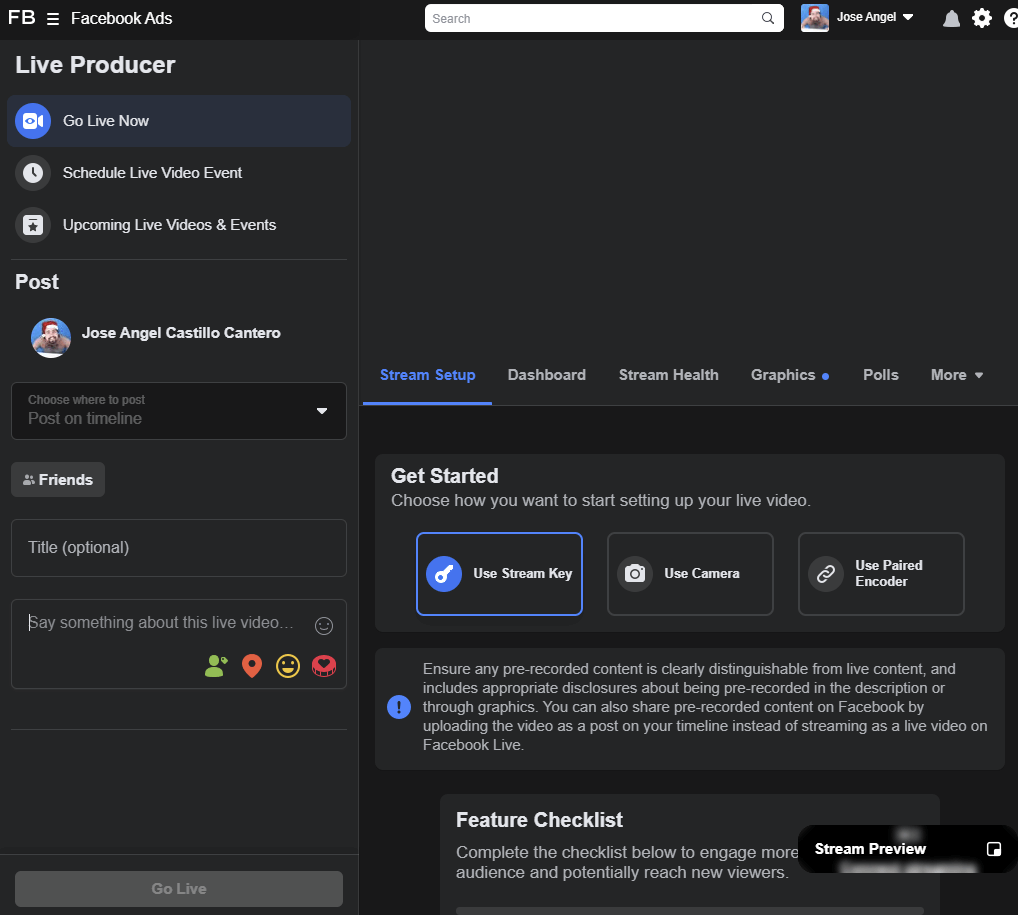
Now you will be asked how, i.e. with which method you want to start your livestream. Here you have 3 options to choose from:
- Use stream key: This method is for you if you want to start your stream via a so-called streaming tool. Streaming tools are plentiful, but the most widely used of these is OBS Studio. Here you can insert the unique stream key automatically generated by Facebook and connect the program to your Facebook account. From now on, the program will serve as an interface between your computer and your Facebook page. This method is the most common and is used when you want to stream what is on your screen. This can be video games, other videos or your Internet browser, for example. With OBS Studio you can create multiple sources and scenes and switch between them during the stream.
- Use paired encoders: This is a method that should be of interest to true streaming and production professionals. Instead of a streaming program, this uses a hardware encoder, which is a real device connected to your computer. Basically, hardware encoders work like streaming tools, but hardware-based rather than software-based.
- Use a camera: You can of course use your built-in or PC-connected webcam or camera to face Facebook users for the first time. This method is suitable if you just want to entertain - without video games.
5 Stream settings

Before you go live, you should take a look at the stream settings. You can find them directly under the stream method selection. Click on "Streaming" to open the options.
5.1 Stop live video if video stream stops
There can always be connection problems or interruptions while you are streaming. If this option is activated, your live stream will be stopped immediately as soon as problems with the connection occur and your video stops for a short time. To prevent all viewers from being kicked out of the stream and having to search for it again, we advise you to deactivate this function by clicking on the button.
If the video is interrupted for a few moments, the stream will continue to run and wait for a signal. This gives you time to get to the bottom of the problem and fix any complications. The majority of viewers understand such interruptions and will accept a short interruption without further ado. When everything is finally working again, you can briefly apologize to your viewers and continue streaming as usual.
5.2 Stream latency
Latency is the time it takes for your real-time activities to reach the user's device. The lower the latency, the faster the signal is transmitted. However, low latency in turn affects video quality. Therefore, you should consider which option is right for your stream.
Streams where you're communicating a lot with your viewers, having conversations, responding to videos, or just chatting a bit into the camera can definitely benefit from low latency at the expense of video quality. Here, there's not as much emphasis on transmission quality, but more on content and latency. With low latency, for example, you can talk to your chat almost lag-free. You see the messages faster and vice versa, your spoken replies reach the recipient faster.
However, if you are a gaming streamer and transmit video game content, things look quite different. Modern games in particular often have very impressive graphics that are worth presenting in the best possible quality. Here, the video quality is in the foreground, which is why you should always opt for the "Normal" option as a gaming streamer. This way, even if you communicate a lot with your chat while playing, you'll get a good balance between stream quality and latency.
5.3 Embed live video
This option generates an embed code that can be used to embed your livestream on a website. So if you have your own website or blog, this is a great way to generate reach. This way you provide additional interaction, because interested users can click directly on the video to play it - without having to open the link first.
5.4 Spherical video
If your stream contains 180 degree or 360 degree content, you can enable this setting. This option is used quite often, especially in IRL streams.
5.5 Do not publish after live video ends
By default, Facebook Live saves your broadcast after the stream ends and makes it publicly available for a certain amount of time. By enabling this option, the content will still be saved, but it will only be accessible by you and the admins of your page. To ensure that your viewers and followers have something to see from you when you are not online, we recommend that you do not enable this option.
6 Viewer settings

To give your viewers the perfect streaming experience, there are still settings options that affect your viewers themselves and the features offered to them.
6.1 Allow viewers to rewind
We know how it is: You watch a livestream, walk away from your PC for a moment, come back and the chat is excitedly discussing or amused by a certain scene. It's too bad that you obviously don't notice what it's all about. But with the "Rewind" function, you have the option to rewind the live video to see what the trigger was. Unfortunately, if you don't have this option enabled, your viewers will be denied this feature, which could make some users feel left out and turn off the stream in frustration. For this reason, you should definitely leave this feature enabled.
6.2 Automatic subtitle creation
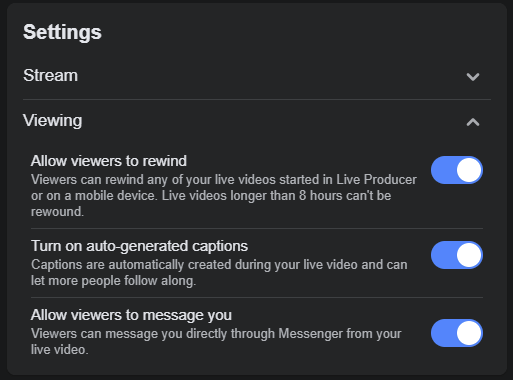
Also a feature that could be a huge help for certain viewer groups and doesn't affect you as a creator in any way. If the option is activated, viewers can switch on automatically generated subtitles in order to follow the stream events better. This feature is still quite experimental and its functionality depends on how good the audio quality of your microphone is and how clearly or quickly you speak. And even if all factors are perfect, that's no guarantee that the subtitles will be displayed 100% error-free.
6.3 Allow viewers to send you messages
Whether you enable this option or not is up to you. It can certainly help you build a closer and more believable bond with your community. But especially when you have reached a certain size as a creator, there may come a point when you don't have time to pay attention to all the viewers' messages and answer them adequately. If you're just starting out streaming on Facebook, you should allow viewer messages and respond to them regularly. By no means feel obligated to answer ALL messages. Especially dealing with messages that are not factually worded or are even insulting or malicious can be selective and very individual. Also, when sending personal messages, you should always be careful about what information you disclose. If you end up disabling this option, we recommend that you communicate this with the community and explain the reasons for this decision.
7 Comments settings

This is all about your viewers' chat messages. You can fully moderate, filter and adjust them to your liking. How your settings turn out in the end is up to you. We can't make any clear recommendations here, but only draw your attention to them. In addition to "Standard", you can choose from 3 different options.
7.1 Subscribers
Unlike the default setting, where all users, regardless of whether they are subscribed to your channel or not, can post comments in the chat, this option allows only supporters, i.e. those who have taken out a monthly subscription to your site, to post and comment.
7.2 Slow
If you choose this comment setting, users will only be able to post a chat message every 10 seconds. This way you prevent spam and nip unobjective discussions in the bud.
7.3 Restricted
To be able to send a comment in your chat, the viewers account must be at least 2 weeks old. A good variant to counteract bots and fake accounts.
7.4 Protected
Viewers must be subscribed to your channel for at least 15 minutes to be able to send a chat message.
8 Setting up the stream with OBS Studio

In this section, we will show you how to set up your Facebook stream with OBS Studio to broadcast video games with a short step-by-step guide. To do that, download OBS Studio and install it on your computer. https://obsproject.com/de/download
- Launch the program and open the settings.
- Navigate to the "Stream" menu item.
- In the Stream Type drop-down menu, select Streaming Platforms.
- And then under Platform, select "Facebook Live".
- Now paste your stream key copied from the Facebook page into the appropriate field and then click OK.
- Go back to the main program overview and create a new scene with the plus symbol under "Scenes" and name it accordingly.
- Now click on the plus symbol under "Sources" to create a new scene.
- In the pop-up menu, select "Screen capture" and choose the screen you want to transfer.
Now you have added a new scene with a screen. The screen you selected should finally appear in the stream.
9 Set the category

Depending on the content you want to stream, you can select a category when creating the stream. Of course, if you want to stream gaming, select "Gaming" and you will be taken directly to a menu where you can select the corresponding game title. This option will help you get listed in the correct category right when you start broadcasting. This way, people will find you faster if they are looking for a specific game, for example.
10 Other settings

Last but not least, you can make some additional settings that can help you to be found and categorized better.
10.1 Thumbnail/Video Thumbnail Image
You can make your stream prettier with an attractive thumbnail. This is an image that is displayed to your viewers before they click on your stream. Instead of a random image, it will then display an image that you have selected, which should then logically match the content you are broadcasting. You can create beautiful and appealing thumbnails using Photoshop, for example, or completely free and beginner-friendly on web portals like Canva.com.
10.2 Target group
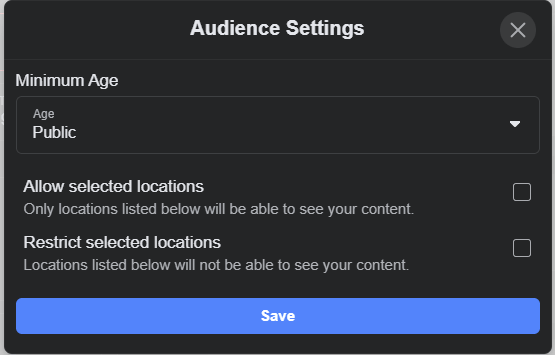
Choose here which target group you want to address with your content. For example, if you want to play a video game that is rated 18+, you need to specify that your stream is an 18+ stream in the target audience settings. Otherwise, you may quickly run into problems with Facebook because you are obviously violating Facebook's policies.
10.3 Locations
Additionally, you can specify if you want to restrict one or more locations.
11 Test stream & the first live stream
So after you've made all the settings, you're actually done and ready to start your stream. But especially if this is your first Facebook Livestream, we would like to introduce you to a great feature of Facebook Live: Test Broadcasts. With this feature, you can take your time to test if all the settings you've chosen are correct and if everything works the way you want it to. When you start a test stream, only editors and administrators of your Facebook page will see that you are live.
When you are happy with your test stream, you can start your real stream for the public to see. From now on, it's up to you to bring out the best and impress the Facebook Live community with your content.
12 Special features during the stream

Now that you're live and your stream is in full swing, you once again have access to a few useful tools that allow you to make the streaming experience more interesting and entertaining for your viewers. These are the two options we would like to share with you here.
12.1 Go live with
While your stream is running, you have the possibility to invite another streamer or a guest into your stream at any time. With the function "Go Live With", which is displayed in your settings overview, you invite a person and your stream will be merged with the stream of the invited person. "Go Live With" is especially useful for playing certain video games together or against each other, or for talking during the stream. When you stream together with other people, it can definitely have a positive impact on viewership and long-term growth. However, make sure that you are the main player of your stream in the long run.
12.2 Crossposting
If you have multiple Facebook pages, you can use the "Crossposting" feature to post a post with the link to your livestream on your chosen pages. Of course, if your Creator Facebook Page is linked to your private Facebook account, make sure that all your friends can see this post. Including work colleagues, bosses, parents, etc. - So think twice before crossposting or preferring to copy the link to your stream and send it to selected friends.
13 Create a schedule

An extremely useful feature of Facebook is "Schedule Stream", which allows you to organize and provide a comprehensive schedule for your streams to your viewers. Once created, the schedule is posted to your deposited Facebook page for all followers and allows for unlimited retrieval afterwards. For you as a streamer, the "schedule stream" feature works like a calendar app. You select the day and can then enter a future stream in detail.
You can enter the following information:
- Title - the title of your planned stream.
- Game - here you can directly select the game that will be played in the stream.
- Date and time - allows exact planning for creator and viewers.
- Estimated duration of the stream - so that your viewers can plan how much time they will need to consume your livestream.
14 Create a poll
During the stream, you may be faced with a decision as a Creator. Maybe you finished a game earlier than planned and now can't decide what's next, or you're wondering if you'd rather order burgers or pizza from the delivery service. So if you're sitting in your streaming chair and don't know what to do, it's easy to ask your community!
With the poll function, you can create an individual poll in the middle of the stream in no time at all and let your viewers vote. This not only makes it easier for you to make a decision, but also actively involves your viewers in the stream - win-win for everyone involved!
15 Facebook Creator Studio
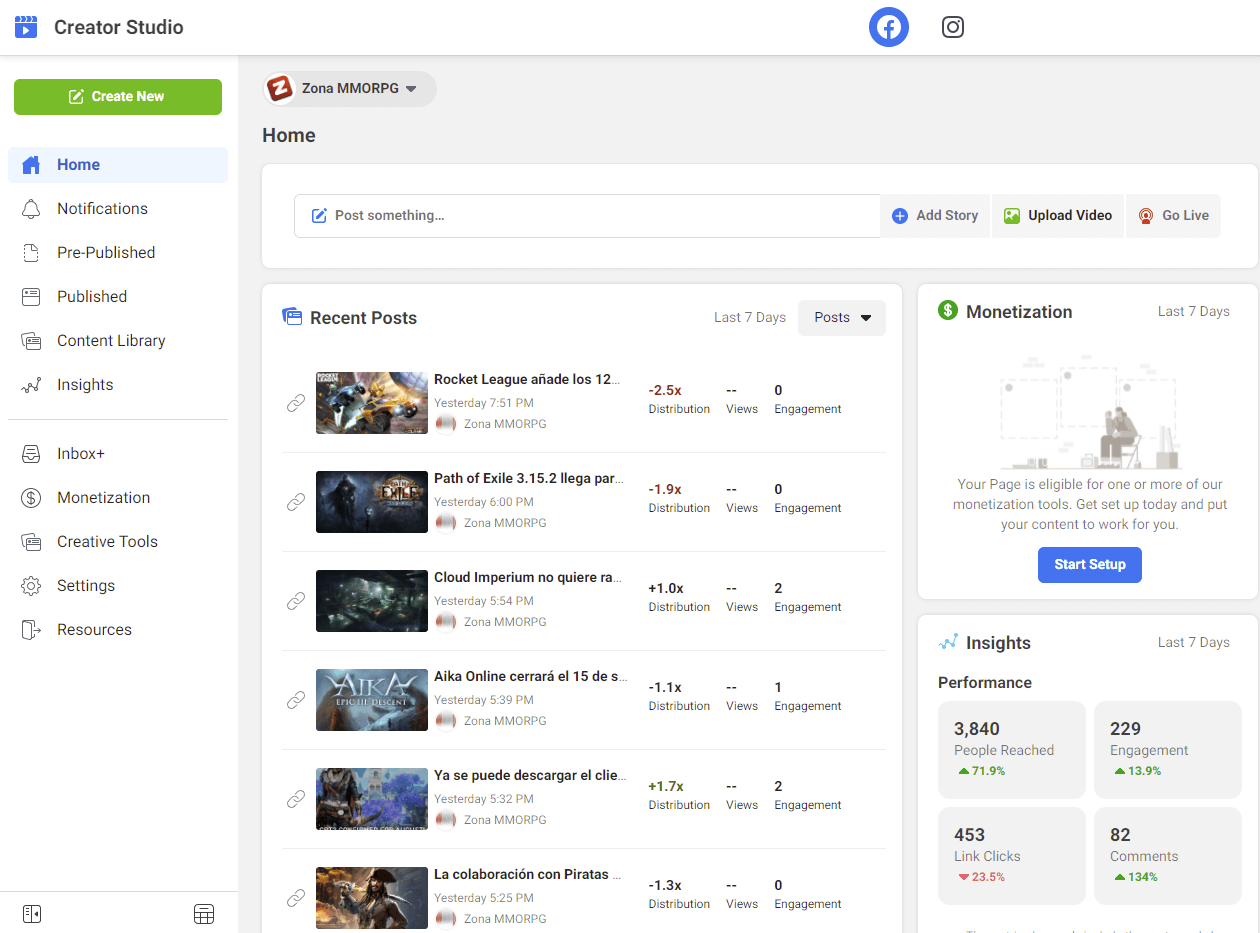
The Facebook Creator Studio is the dashboard of your pages, the hub of your settings options and ultimately the place where you can view all the data of your livestreams. On this page https://business.facebook.com/creatorstudio you have the possibility, under the menu item "Live Dashboard", to analyze the past livestreams in more detail, so that you can draw conclusions from this data about what still needs to be improved.
Under Monetization, you have an overview of your current situation, how many Facebook Stars you have already earned, and what your current account balance looks like. You can also set your payout preferences here. So if you have already earned money with Facebook, this menu is the first place to look at your financial data. A detailed overview of when and how you can theoretically start earning money on Facebook will follow in the next few paragraphs!
16 Earn money as a streamer on Facebook Live

We don't talk about money? Oh, yes we do! In our ultimate Facebook Live guide, an important and essential topic of live streaming cannot be missing: monetizing your activity as a creator. So this chapter is about how you can earn money with your hobby and eventually maybe even turn your hobby into a profession. Here we will show you all the options you are given as a creator to generate income on Facebook.
16.1 Facebook Stars
An often used way to monetize your stream is to use so-called Facebook stars. This is a virtual and Facebook-exclusive currency that viewers can buy to support you financially. But what do your viewers get out of buying Facebook Stars with real money and donating them to you?
Each time they donate, an alert is triggered in the stream that varies in excitement depending on the amount donated. You can reward more or less generous donations by mentioning the corresponding user by name in the stream and thanking them. You will receive $0.01 per star donated to you. Once you have collected 10,000 stars, you can initiate your first payout to your bank account in the Facebook Creator Studio.
16.2 Fan Sub
The classic source of income for all streamers - the good old subscription. This is probably the most common way to financially support streamers and creators across platforms.
Users can sign up for a subscription, which gives them some benefits like exclusive content, supporter badges or the use of exclusive stickers. At the same time, the 4.99 US dollars, i.e. the entire price of the subscription, goes to the corresponding streamer. This procedure is largely unique in the streaming world, because it is usually the case that the streaming platform also always receives a portion of the subscription costs. The supporter is henceforth marked as "Supporter" in the stream and has access to certain additional features.
As a creator, once you offer Facebook subscriptions, you can mark your stream as a "sub-only" stream, which means that this stream can only be seen by supporters. It's a great way to show your appreciation to your supporters away from your usual stream schedule.
In order to offer Facebook subscriptions, you must participate in Facebook's so-called Level Up program, which means you must have at least 100 page subscribers and stream regularly. You can learn more about the Level Up program later in this guide.
16.3 "Donate" button
You can add a "Donate" button to your stream, which viewers can click to support a fundraiser you create for charities or organizations.
17 Level-up program

Facebook's Level-Up program is equivalent to Twitch's affiliate program. It the first milestone a streamer passes on the way to becoming an official affiliate. In addition, the Level-Up Program is the perfect entry point to actively and regularly generate revenue with streaming.
Viewers can award Facebook Stars, become supporters of your channel, and be there when how your page grows steadily. Ultimately, both streamers and viewers/followers/subscribers benefit from activating the Level-Up program. Before you are activated for the program, you will of course be subject to new conditions on the part of Facebook. In order to finally participate in the Level Up program, you will have to accept them, but before you do so, we advise you to first familiarize yourself with the guidelines imposed on you.
It is also worth mentioning that you will have to pay taxes on your future income as a Facebook streamer. Therefore, clarify all the legal obligations that you will incur by accepting any agreement in advance - if necessary, with the help of a legal advisor or tax consultant.
Advantages for streamers
- Facebook Stars
- Fan subscriptions
- Live advertising
- Prioritized support from Facebook
- raids
Benefits for viewers
- Higher stream quality (Full HD & 60 FPS)
- Become a member and access community features of the Facebook page
- Members receive special badges
- Access to "sub-only" streams
Requirements
- At least 250 regular returning viewers
- 100 likes on your Facebook page
- You have streamed at least 2 days in the last 14 days
- You have streamed gaming content for at least 4 hours in the last 14 days
- Check here for country-specific requirements to join the Level-Up program.
18 Affiliate program

Facebook's Partner Program is more or less the Level Up to the Level Up Program. As an official Facebook Partner, you'll receive exclusive bonuses in addition to the benefits you're already familiar with from the Level Up program. While the requirements for participation are not clearly defined and streamers with consistently good performance are individually selected as partners, the advantages over the Level Up Program are obvious.
Advantages of the Partner Program compared to Level-Up
- Subscription gifts
- Brandedd content
- Invitation to certain events
- Early access to certain functions within the platform
- Partner badges
- Prioritized support gaming
- Community gifts
19 Fan stickers

To give your stream a personal touch, you can unlock fan stickers for your supporters. These work similarly to the tried and tested emotes/emojis from Twitch & Co. and serve as a great reward for loyal subscribers. Viewers can post your individual stickers in the chat to show how they like your stream. You can easily upload and manage stickers yourself in the Creator Studio.
Fan stickers must be uploaded in the following 3 sizes:
- 240 x 240 pixels
- 32 x 32 pixels
- 16 x 16 pixels
20 Marketing / public relations and generate reach
Things are heating up 24/7 in the big world of livestreaming. Millions of streamers regularly broadcast their content on various platforms. But how do you manage to be seen better and what do you need to keep in mind? In this section, we'll look at how you can expand your reach as a creator on Facebook Live and even optimize and automate the process behind it to some extent.
20.1 Before the stream

- Schedule your streams - With Facebook's built-in "schedule stream" tool, you can create a detailed calendar of stream times and topics for your audience. This will help you stay top of mind even if your stream isn't live at the time. Viewers can mark your next stream date in red on their calendars and even tell their friends about it until it happens.
- Announce your streams on social media - Ideally, you should have your social media accounts on your Facebook page so that you can generate followers who are interested in you. With clever use of the powerful weapons of Twitter and Instagram, you remind everyone once again that you'll be launching your stream soon. Best of all, you might even attract new viewers to your stream this way.
- Use your Facebook page - As a streamer on Facebook, your Facebook page is worth its weight in gold! This is where your followers gather, and they can see every post you make. So if you draw attention to your future streams with targeted regular posts, you'll stay in the minds of your followers and won't be forgotten. Because let me tell you this: The people who already follow you have already given you a huge vote of confidence.
It should go without saying that you address this group of people directly on your Facebook page. With this method, you may not generate many new followers - but you will strengthen the relationship with your existing followers. And that is at least as important.
20.2 During the stream

- Keep an eye on your chat and react to it - streaming means interaction. Both for Creator and for viewers. Your chat is your permanent source of feedback and immensely important when it comes to giving the user a great streaming experience. To avoid disappointing your viewers and risking a potential unfollow, you should stay in constant communication with your chat. Make your viewers feel like they are part of the stream and not just some nameless extras.
- Stay active and try to entertain people as much as possible - This is certainly easier said than done, but it's true. During the livestream, people usually watch you because they like your way of entertaining. So you shouldn't disappoint them by not making a sound for minutes, almost falling asleep in front of the screen or spreading bad vibes. To make your Facebook page grow in the future, always try to do your best during the stream and entertain the viewers. If you find it difficult to maintain a certain level of competence for hours on end, for example, you can always take small breaks, shorten your streams or motivate yourself again with new challenges in the form of new content.
- Respond to feedback - You should also respond to feedback and be as individual as possible - positive as well as negative. For example, thanking someone for a new subscription will have a positive impact on the overall mood of the chat. And even negative feedback can end up leading to a meaningful and insightful discussion.
- Give off a positive vibe - Even though it may seem strange to you at first, people are tuning in because of YOU. Because they like watching you stream. That's why you should make your viewers' streaming experience as positive as possible. Make sure everyone has a good time and wants to tune in again next time.
20.3 After the stream

- Duplicate and share your content - At best, while you're streaming, you'll create some entertaining moments worth capturing. Facebook gives you and your followers/subscribers the option to re-watch your past broadcasts as VOD. So you could copy the link to the VOD and share it on your Facebook page for the people who couldn't be there.
Also, it's recommended that you cut out the best moments from a stream and create small clips from them, which you in turn post on your social media accounts or on your YouTube account. This way, people who don't know you yet will immediately get an impression of how you stream, which will ideally lead to them joining you next time.
21 Conclusion and reasons why Facebook Live is worthwhile for Creator

While Facebook Live may not yet boast the largest community, it is a platform with extraordinary potential. With 2.8 billion active accounts, Facebook is still the largest social media platform in the world. So it's not as if Facebook Live's potential users are lacking. With the clever integration of video, livestreaming and social media content, Facebook Live is seeing steady growth. With the acquisition of Microsoft's streaming service Mixer, livestreaming has really taken off for Facebook, and with one of the largest companies on the planet, it's no wonder they can afford to take a cue from the "big two" of Twitch and YouTube.
Facebook Live is also interesting for professional streamers or those who want to become one in that the monetization opportunities on this platform are very fair. Creators will receive 100% of the $4.99 invested by fans until 2023 if they sign up for a subscription. By comparison, streamers on Twitch only receive half of the revenue from subscriptions - the other half goes directly to Twitch's account.
Another advantage for aspiring streamers that should not be underestimated is that the community on Facebook Live is still relatively small. As a newcomer, you don't have to compete against millions of other ambitious streamers like you do on Twitch or YouTube, but you only have to face a manageable number of competitors. In addition, you see big streamers switching from Twitch or YouTube to Facebook Live again and again. It wasn't until early 2021 that Taiwanese-Canadian creator DiguisedToast switched to Facebook and has since regularly recorded over 10,000 concurrent viewers.

