1 Streamlabs OBS recording
If you say streaming, you have to say VoD. That's how it is as a creator these days! In this day and age of Twitch and YouTube, if you're a Creator, you have little chance of making it if you rely solely on streaming. With good VoD content on YouTube, you can address a completely different target group than on Twitch and form a large community from two different camps. What kind of content you upload to YouTube is up to you, of course, but a good way to combine streaming and videos is to record the streams and later present them to your subscribers on YouTube as a whole episode or as an edited highlight video.
However, to do this, the streaming tool you use needs a so-called recording function. This allows you to additionally record the current streaming session and save it to your hard drive. A very good program that has this function is Streamlabs OBS. The all-rounder among the streaming tools saves your streams on your hard drive if required so that you can open up completely new possibilities with the material. But how can you actually record with Streamlabs OBS and what do you need to know? In this detailed guide, we want to familiarize you with the Streamlabs OBS recording feature, introduce you to the different recording options and show you how to start recording with just one click. Have fun!
2 Streamlabs OBS Recording - how does it work?
By now, recording video content on a PC is relatively beginner-friendly and self-explanatory. While a few years ago you had to work with professional programs, some of which cost half a fortune, to make halfway decent recordings, nowadays there are many different tools that allow you to easily record quality videos. Streamlabs OBS lets you specify which part of the screen you want to record and the quality of the recording. You can also specify where, i.e. in which folder or on which hard disk you want to save the recording so that it doesn't become too confusing. You should keep in mind that when the program records your screen, it uses a significant amount of your computer's resources.
Especially the processor is stressed when recording Full HD videos. Add to that playing a hardware-hungry video game and streaming, and your PC may reach its limits pretty quickly. So if you want to combine streaming, gaming, and Streamlabs OBS Recording, you need a powerful and reasonably modern computer. Since every PC is set up differently and every game has different system requirements, it's best to just try it out once and check how high the load on your processor is. To do this, you can resort to one of the numerous free system monitor tools that are available on the Internet.
3 Streamlabs OBS recording - before recording
Before we show you how to record with Streamlabs OBS, we would like to familiarize you with the settings available for the recording function. It is also important to know beforehand how the different options differ from each other and how you can optimize the performance of your system during recording.
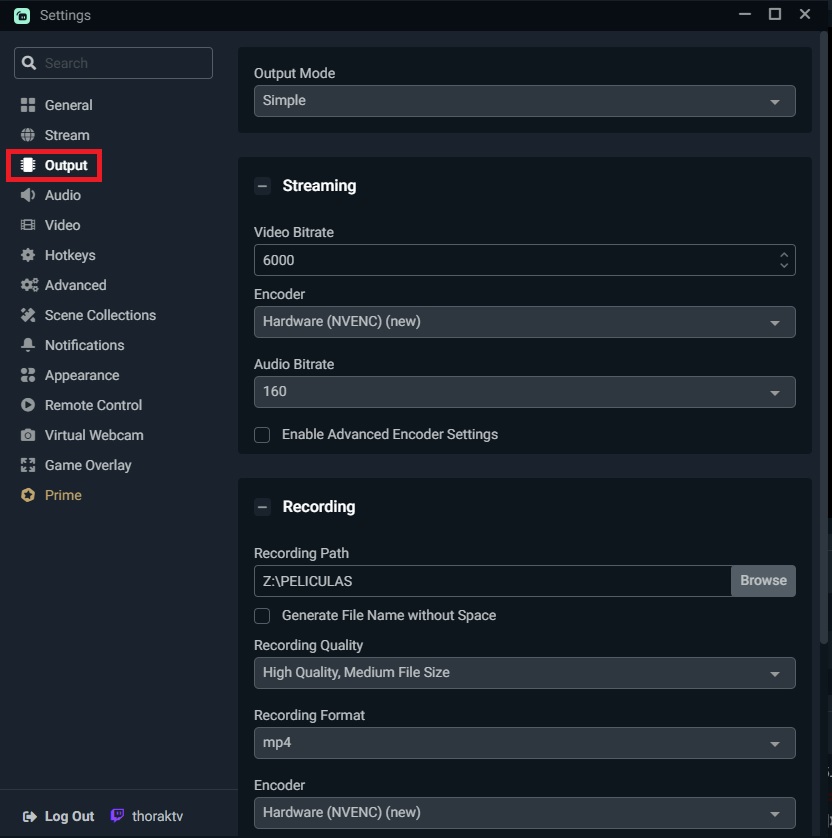

Of course, you can start a recording without any further action, but it is always worthwhile to have a look at the recording settings of Streamlabs OBS beforehand. You can find them by opening the program and clicking on the gear icon in the lower-left corner and then on the "Output" tab in the menu. To get all possible settings displayed, you can select "Advanced" in the drop-down menu under "Output Mode". Now 4 different tabs appear in the menu - click on the tab labeled "Recording" to enter the Streamlabs OBS Recording menu.
3.1 Recording Path
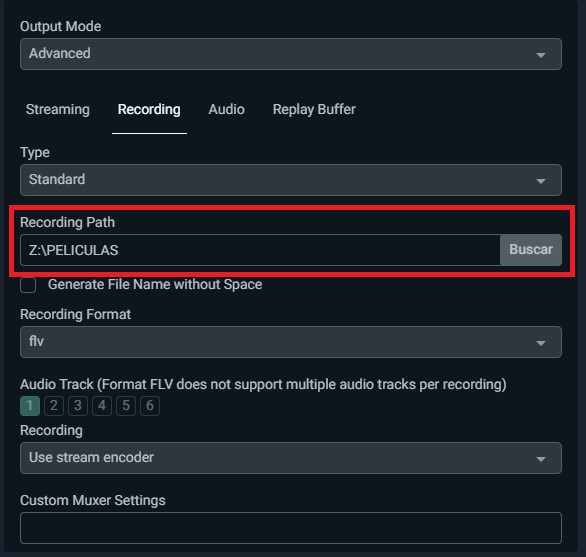
Here you can choose the path where you want to save your videos. We recommend you organize your video files right from the start, otherwise, your videos might be scattered all over your PC and hard to find. The best way to do this is to create a new folder and assign a name to the corresponding file directly after the session - ideally with a date. This way you always have a perfect overview of your saved videos.
3.2 Recording format
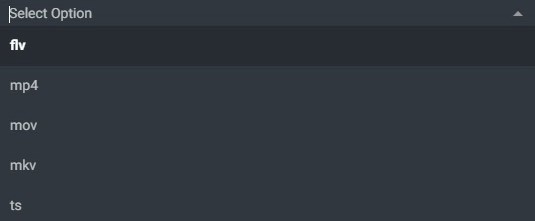
Choosing the right recording format for your videos is extremely important if you want to edit the videos later and maybe even cut them additionally. In Streamlabs OBS the default format is flv. However, you have the option to choose between flv, mp4, mov, mkv, and ts in the settings. Past experience has shown that mp4 has proven to be the best format for gaming videos. It offers good video quality and is also quite compact and doesn't take up too much space on the hard drive. Moreover, it is compatible with YouTube and can be uploaded without having to convert it first. The mp4 format is also perfect for video editing programs like Adobe Premiere or Apple Final Cut. To see for yourself what each format is like, we recommend you try them out for yourself. In order to be able to determine the differences in quality and file size, you should of course make sure that the comparison videos are always the same length and that you record the same material.
3.3 Audio Track
Here you can select which audio tracks should be recorded. For example, if you are in Discord with your friends and there is a lively conversation, you may not want these voices on your recording. You can also mute the signal from your microphone directly. This could be important if you are recording during a stream and want to edit and publish the video afterward.
3.4 Recording Encoder
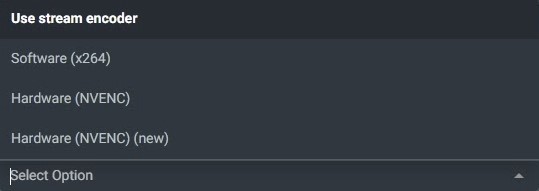
An encoder is used to process the video signal during recording and determine how it should be saved. The different encoders all have different specifications and advantages and disadvantages. If you choose a software encoder, your processor will be largely responsible for handling these tasks, while hardware encoders rely more on the power of your graphics card. Thus, while playing graphics-intensive games, it might make sense to choose a software encoder so that your graphics card still has enough capacity to render the game accordingly.
4 Streamlabs OBS recording - important tips before the start
Of course, there can always be minor beginner's mistakes when you want to record with Streamlabs OBS. For this reason, we've put together a few useful tips and tricks that you should definitely take to heart.
4.1 Make sure you always have enough free disk space available

Nothing is more annoying than a great recording that suddenly stops because the hard drive, SD card, or USB stick is full. This is what will happen when Streamlabs OBS notices that it is running out of space. Therefore, you should always make sure to have enough storage space for your recordings. Especially the high-quality Full HD or even 4K recordings can take up a lot of space on your hard drive. It would be perfect if you have a hard drive that is only dedicated to recordings.
4.2 Set the Streamlabs OBS Recording function to a hotkey
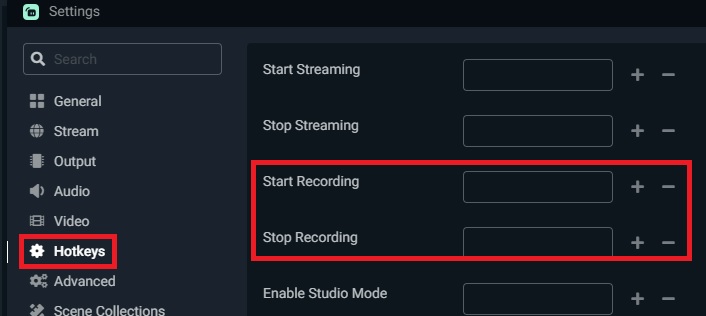
Normally you start a recording in Streamlabs OBS by clicking with the mouse on the REC button. Since this can be quite inconvenient, especially when you are playing games, we recommend setting the "Start Recording" and "Stop Recording" functions to a key on your keyboard. It's best to choose two keys that are of no concern to the game or to you in desktop mode. You can access the hotkey menu of Streamlabs OBS in the settings under the tab "Key Commands".
4.3 Make a test recording
Once you have made all the settings, before getting serious, you should start a small test recording to see how the quality of the video is and if everything is as you want it to be. So a dress rehearsal before the first real recording is quite helpful.
4.4 Format your external hard drive to the right format
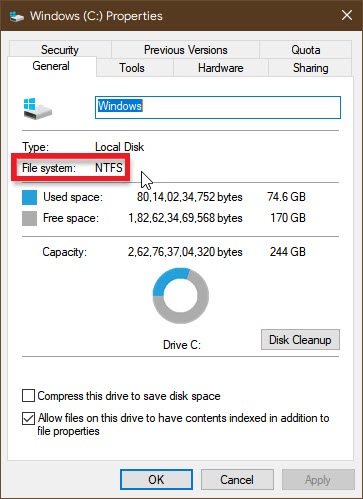
One stumbling block that even some long-time procreators have fallen over: the format of the external hard drive. In case you want to save the clips on an external hard drive, it is important that you format it to NTFS or exFAT format. The good old FAT32 format only supports files with a maximum size of 4 GB. In times of Full HD & 4K, video files can easily be several GB in size. Especially if they are several hours long, as is often the case with streaming. So if your external hard drive is in FAT32 format, recording will stop when the file reaches the maximum size of 4GB.
5 Streamlabs OBS Recording - the step-by-step guide
As you can see, choosing the right settings is essential when it comes to starting a recording with Streamlabs OBS. So in this chapter, we will finally show you how to start a recording and how to find it afterward.
Start Streamlabs OBS.
Set up your scenes and sources so that the program knows which signal to record. To do this, click the plus icon under "Scenes" and then add a source to that scene - for example, "Gameplay" or "Screen".
After everything is set up and the game or stream is running, you can start recording.
Just click on the big red REC icon in the lower right corner of the program.

Once the recording is running, you will see a timer to the left of the icon that shows how long the recording has been running.

Clicking on the icon again will finally stop the recording.
To see where the saved video is now, you can go to the Streamlabs settings and see which folder you have chosen as the save path.
Click on the gear icon in the lower-left corner and then on the "Output" tab. Under "Recording" you will find the menu item "Recording Path". This is the folder where your recording is now located.
6 Conclusion
Streamlabs OBS Recording is a breeze to use - even for streaming beginners and budding creators. However, there are some things to consider before the actual recording, which can have a big impact on the size and quality of the recording as well as on the system load of your computer. For a perfect result, we recommend that you follow the tips and tricks in this guide and choose the settings that are best for you and your PC.

